Is it too early for WiFi 7 hardware adoption? Ubiquiti doesn’t seem to think so and it has already made available its first WiFi 7 access point, the U7 Pro. And while other manufacturers wanted to make a big deal out of it, equipping their access points with all the bells and whistles that they could, Ubiquiti took a slightly different approach.
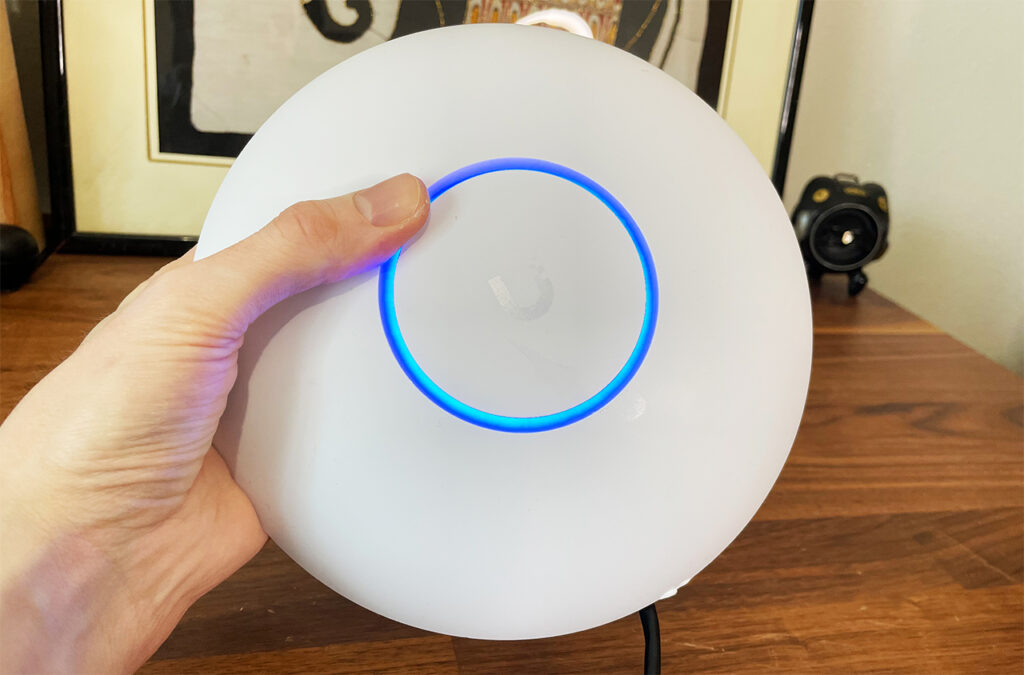
In a similar manner to the U6 Pro and the U6 Long Range, they opted to keep the U7 Pro fairly accessible, so it will look a bit less impressive on the paper than let’s say, the EnGenius ECW536. But does it matter? We’re still in the initial draft stage, so there will be issues with compatibility in the future, and lots of new features will probably require better or different chipsets. It’s a bit of a gamble to invest in expensive WiFi 7 hardware at the moment. In any case, the U7 Pro does support the 6GHz radio, it has six spatial stream and it can be powered via PoE+.
MLO is not yet supported, but Ubiquiti says that it will become available with future software updates. There are a few other very strange choices that have been made here. One is the decision to go with a 2.5GbE port – probably for keeping the cost low or maybe because the access point can’t really go above this data rate at all. The second one is the decision to go with a fan. Yep, there’s a fan inside the case to keep the temperature low. We will talk a bit more about it in the thermal section, so let’s put the U7 Pro to the test and see if it’s worth getting.
The Design and Build Quality
The Ubiquiti U7 Pro measures 8.1 x 1.8 inches, so it’s a tiny bit larger than the U6 Pro, but actually smaller than the U6-LR. And the manufacturer has kept the same now iconic flying saucer design entirely covered by a white matte finish and with a multi-color LED shining through the circular opening in the middle of the case.
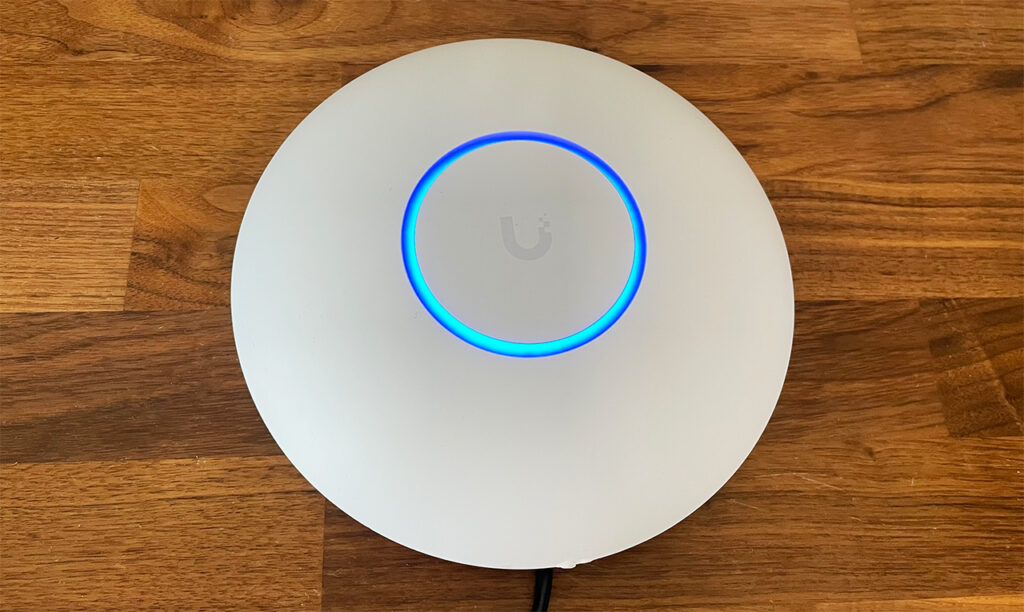
Unlike some previous generations, the U7 Pro is not IP-rated and doesn’t seem to be built to withstand the elements. Although the top and bottom parts are glued together, as usual for Ubiquiti APs, I think that water can enter the opening for the fan. And yes, we do get a small fan to keep the temperature in check. The mounting mechanism is fairly simple since all you need to do is rotate the device into a base, and yes, this is a ceiling-only device, lacking any feet to keep it steady on a desk.
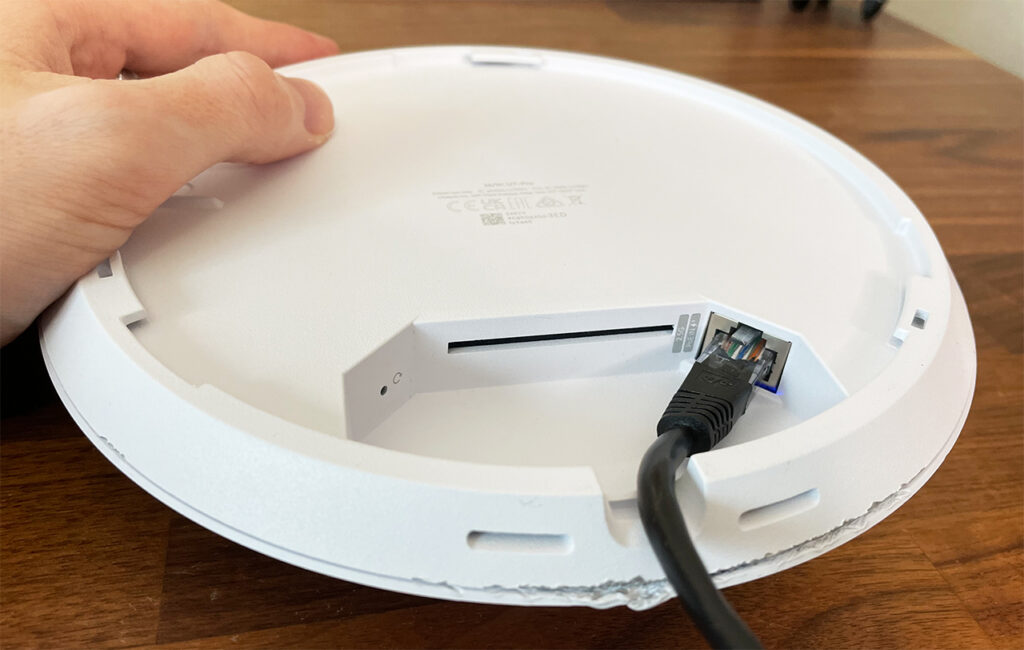
On the bottom of the access point, Ubiquiti has added a Reset button on one side of the fan opening, while on the other side, there’s a single 2.5GbE port. As a comparison, the EnGenius ECW536 has two 10GbE ports, while the Zyxel NWA130BE has two 2.5GbE ports, the latter actually being very close to the U7-Pro in terms of price.
Certainly, they must have put more budget somewhere else, so let’s see what’s the deal with this fan.
The Thermal Management
There has been a lot of debate on whether Ubiquiti made a genius move when they added the small fan on the U7 Pro or whether they have actually gone mad. There have been lots of complaints that Ubiquiti access points run too hot, up to the point of plastic discoloration, so perhaps this was the only way the developers thought would fix the thermal issues.
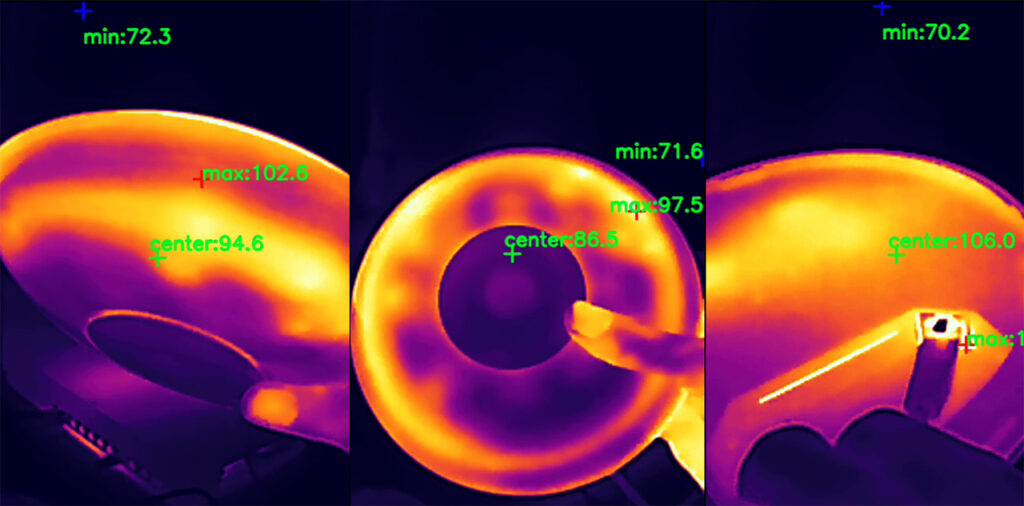
In my experience, the fan will not enable as long as the temperature doesn’t rise above a certain threshold, but what happens when it does? Is it loud? I only heard it once when I started up the U7 Pro the first time, after that, even during the multi-client tests, I could not hear it, despite it being operational most likely at very low RPMs. And, as you can see from the photos, it does a fair job at keeping the case cool. But let’s address the elephant in the room. What happens if the fan fails? You would think that Ubiquiti made the access to the inner parts of U7 Pro easy since the fan may need maintenance or replacement, but no, you’re going to need specialized tools like when opening a smartphone, otherwise the plastic case will get damaged and bye bye warranty.
Ubiquiti U7 Pro Teardown
The Ubiquiti access points are hard to open and that’s a fact I had to accept ever since the days of the UAP-AC-Pro. But for whatever reason, it feels like the latest versions get better glued together, so it feels even harder with the U7 Pro.
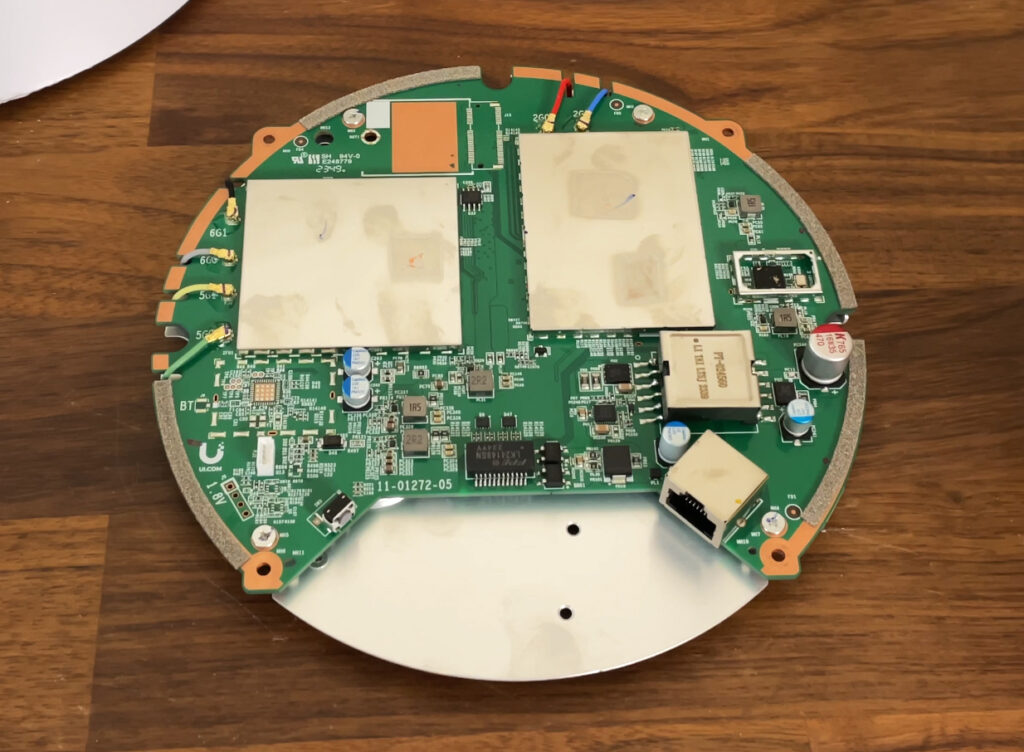
In any case, you can see the full teardown video here, so know that you need a prying tool, lots of patience and some bandages for your finger. Also, the warranty will most likely be voided in the process. After popping off the case, you’ll see the antennas at the top and on the other side, there should be a wire that connects the fan to the mainboard. After detaching it, I could identify a few components, such as the Qualcomm QCA8081 Ethernet PHY transceiver and the 1GB of RAM from Samsung (SEC 340 K4A8G165WC) DDR4.
Next, we could see the quad-core 1.5GHz Qualcomm IPQ5322 (ARM Cortex-A53) chipset which does handle the 2.4GHz WiFi as well. And the Qualcomm QCN6274 WiFi 7 (802.11be) 2×2 (6GHz Single Band Module) + 4X 4659 FSP4 modules for the 6GHz and the 5GHz WiFi.
Lastly, on the other side, I could barely identify the 512MB of storage memory from KINGSTON (2401032 EMMC04G-M627).
Hardware Comparison
| Ubiquiti U7 Pro | EnGenius ECW536 | Ubiquiti U6-Pro | Ubiquiti U6-LR | |
| CPU | quad-core 1.5GHz Qualcomm IPQ5322 | quad-core 2.2GHz Qualcomm IPQ9570 (A73) | dual-core 1GHz Qualcomm IPQ5018 | dual-core 1.35GHz Mediatek ARM MT7622AV |
| RAM | 1GB Samsung (SEC 340 K4A8G165WC) | 2GB (2x Nanya NT5AD512M16C4-HRI) | 1GB 2x Kingston D5128ECMDPGJD | 512MB (2X Winbond W632GU8NB-11) |
| Storage | 512MB KINGSTON (2401032 EMMC04G-M627) | 512MB NAND (MXIC MX35UF4GE4AD) | 4GB Mouser Electronics (THGBMNG5D1LBAIL) + 8MB MXIC (25U6432F) | 64MB Winbond (25Q512JVFQ) + 16MB and 512KB from MXIC |
| Switch | Qualcomm QCA8081 Ethernet PHY | 2x RealTek RTL8261N N2068H3 | Qualcomm IPQ5018 | Marvell AQrate AQR112G |
| 6GHz Radio | Qualcomm QCN6274 802.11be 2×2:2 | Qualcomm QCN6274 802.11be 4×4:4/td> | – | – |
| 5GHz Radio | Qualcomm QCN6274 802.11be 2×2:2 | Qualcomm QCN6224 802.11a/n/ac/ax 4×4 4×4:4 | Qualcomm QCN9024 802.11a/b/g/n/ac/ax 4×4:4 | Mediatek MT7975AN and MT7915AN 802.11a/b/g/n/ac/ax 4×4:4 |
| 2.4GHz Radio | Qualcomm IPQ5322 802.11b/g/n/ax 2×2:2 | Qualcomm QCN6214 802.11b/g/n/ax 4×4:4 | Qualcomm IPQ5018 802.11b/g/n/ax 2×2:2 | Mediatek MT7622 802.11a/b/g/n 4×4:4 |
The WiFi Features
We already know that MLO is not yet a part of the Ubiquiti U7 Pro, but apparently will be in the coming days it seems. But they did move the goalpost several times already. Anyway, we do get three radio bands, including the most wanted 6GHz frequency band and the 320MHz channel bandwidth which is excellent.
If you intend to use the 5GHz radio, then the limit remains 160Mhz, of course. The U7 Pro remains 2×2 across all three radios, so no, the 6GHz is not 4×4, despite the fact that the possibility was there considering the used chipset. Some other features from the previous WiFi gen are present here, including OFDMA and MU-MIMO, but of course, both require compatible client devices. If you don’t have WiFi 7 or at least WiFi 6 and 6E client devices, then there is little sense in investing in a WiFi 7 access point at the moment. The Ubiquiti equivalent to mesh is still supported in the form of Uplink and that’s about it for now. Let’s see the access point in action.
Single Client Tests (6GHz & 5GHz)
We have gotten accustomed to the single-client tests values and graphics, so let’s start with them as well.
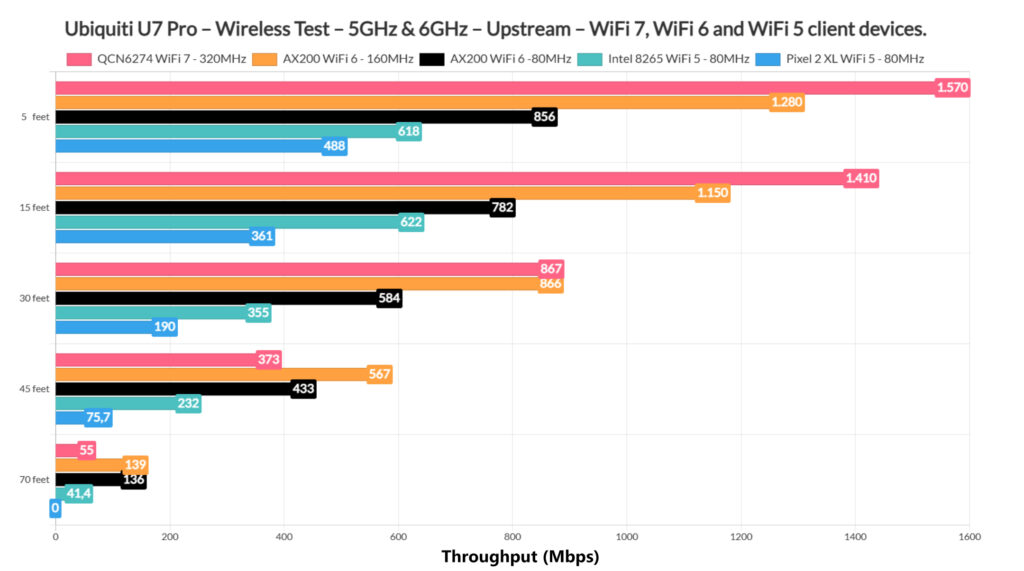
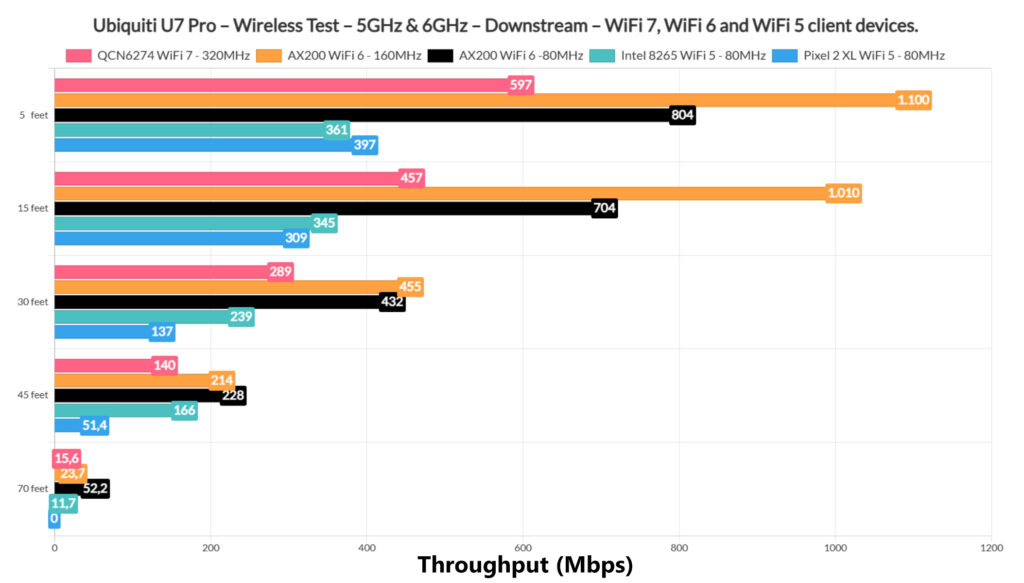
I also made sure to include the signal attenuation which is a far better metric to use than distance. This way, you can actually reproduce these results in your own home. Understand that 5 feet with a lot of interference is not the same as 5 feet with no interference. While -40dB is -40dB regardless of the space where the access point is tested. If you checked the other WiFi 7 AP that I recently tested, the EnGenius ECW536, you know I had a lot of trouble with the BE200 adapter from Intel which made me pause the testing all together for the 6GHz and wait for a Qualcomm alternative.
Fortunately, I did manage to get one from MSI, the Herald-BE NMC865 and I did use to it see how well the Ubiquiti U7 Pro performs. As for the 5GHz, I used the same Intel AX200 adapter and checked throughput using both the 160MHz and the 80MHz channel bandwidth, the former successfully using DFS channels.
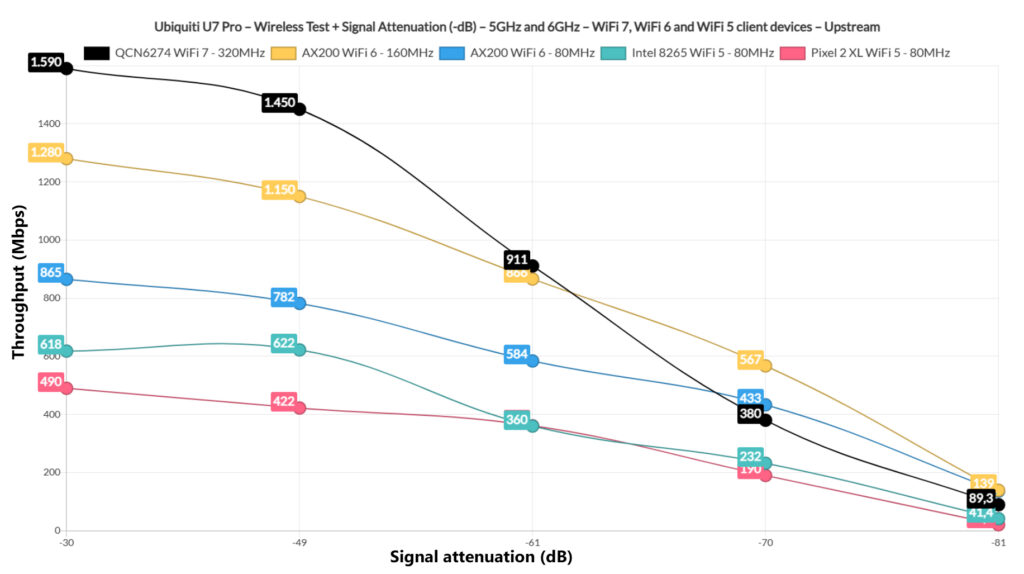
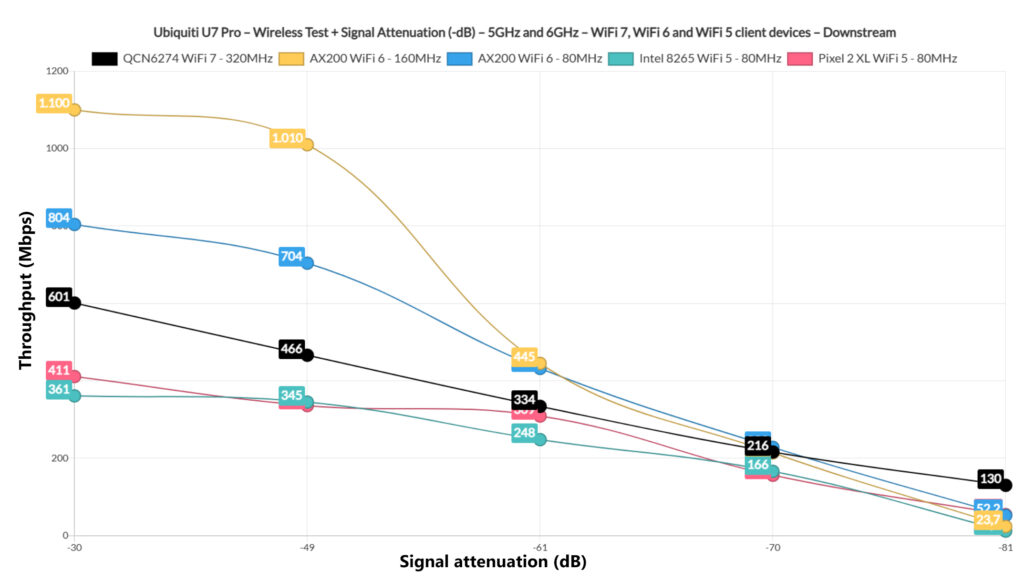
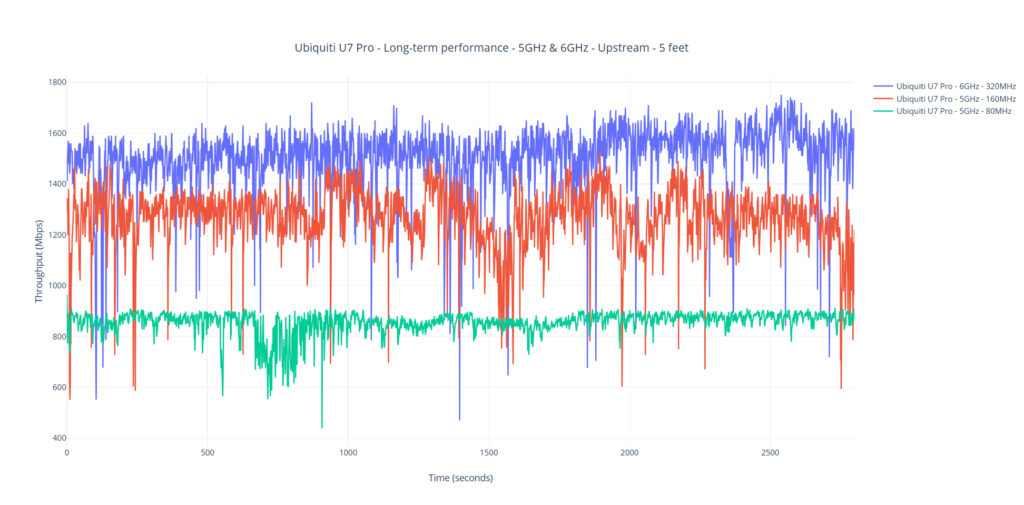
As for the throughput using the 6GHz radio band, we see some impressive results upstream, above the EnGenius ECW536, but downstream, I saw an unexpected drop. I assume that it’s still an issue with the card, most likely in regards to the driver, but I will have to investigate further.
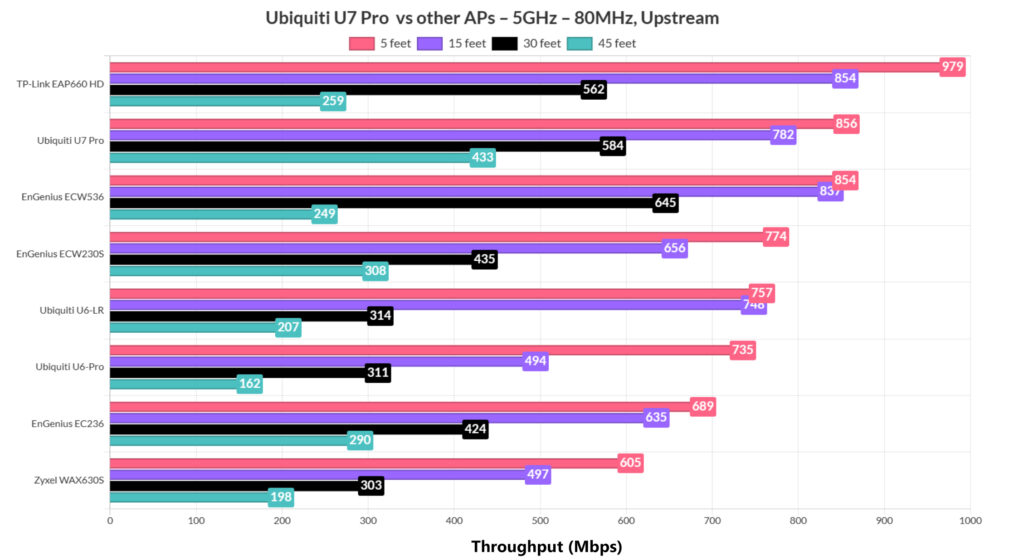
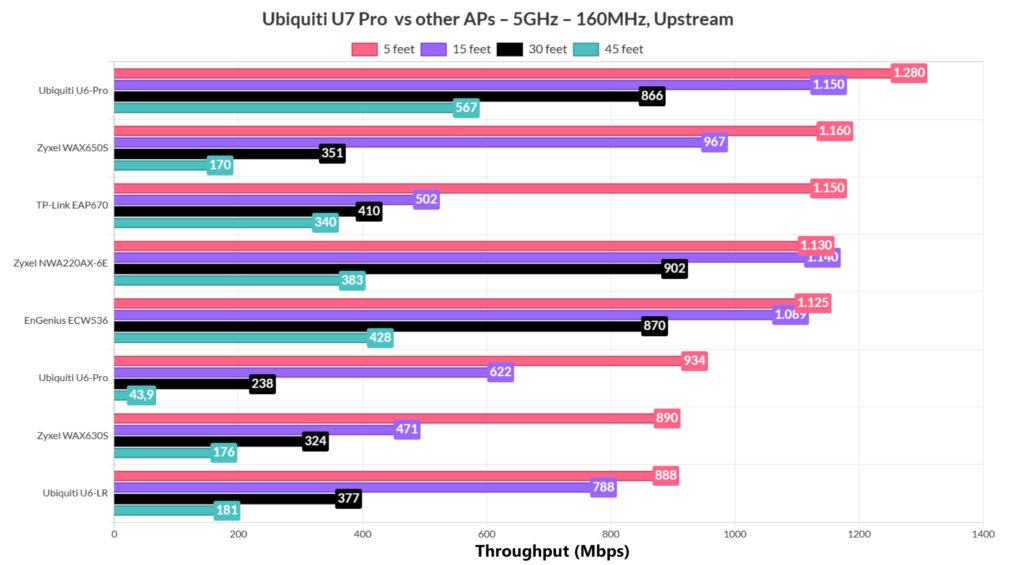
The U7-Pro goes above all other access points when the clients are connected to the 5GHz network. When compared to the U6 Pro and “>the U6 LR, it outperformed both, but remember that the test is done using a 2×2 Intel AX200 adapter.
At the end, I also had to include a slightly longer-term performance graph to see how the throughput fluctuates without changes in terms of interference.
Single Client Tests (2.4GHz)
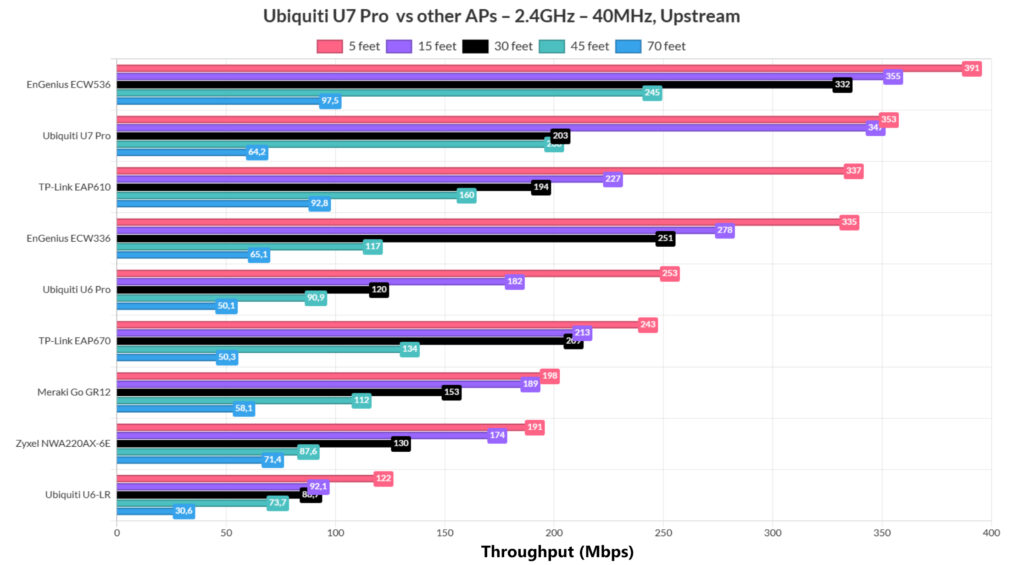
Lately, I started to put less emphasis on the results collected using the 2.4GHz radio band and that’s because it was pretty much left only for the IoT and generally smart devices.
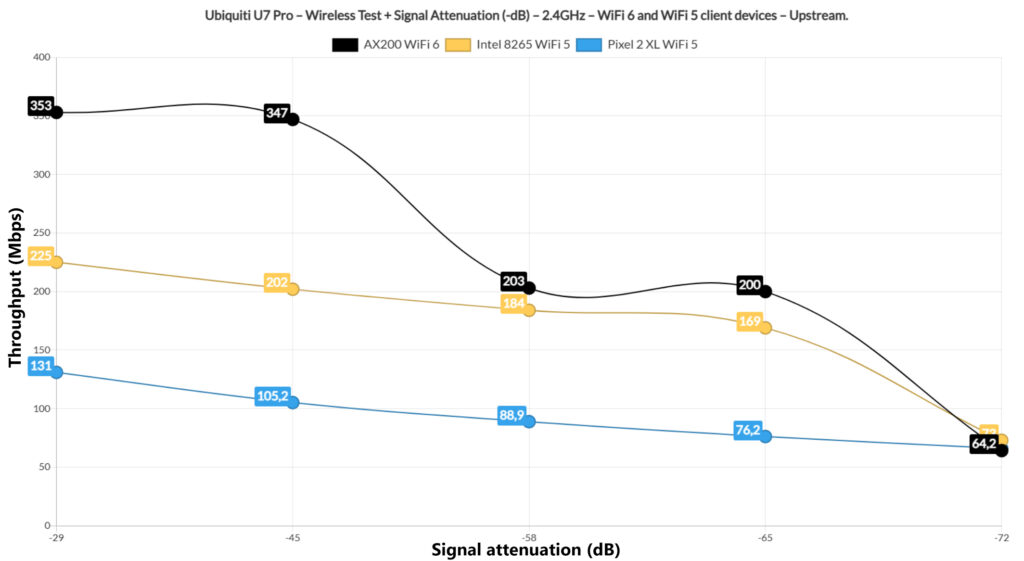

But I still got to see some good results especially when using the AX200 adapter. It’s actually only second to the ECW536 which is a far more expensive access point. Not bad at all.
The Multi-Client Tests
I left the multi-client tests at the end, but that doesn’t mean that they’re not important. Quite the contrary, a multi-client test can show if an access point is able to handle various types of traffic at the same time. It’s easy to run an iperf test with a client device, log the data and call it a day. But it’s not going to reflect the real-life experience. So, I used the same tools that I used before that are developed by Mr Jim Salter and I started with the 1080p traffic simulation on five client devices at the same time.
It’s worth mentioning that these are the specs of the client devices:
| 2x Lenovo Y520 | Custom PC | MacBook Pro | ZimaBoard 832 SBC | |
| WiFi Adapter | Intel AX200 WiFi 6 | Intel AX210 WiFi 6E | 802.11ac WiFi 5 | Asus PCE-AC68 WiFi 5 |
| RAM | 16GB | 16GB | 8GB | 8GB |
| Storage | NVMe SSD | SSD | NVMe SSD | SSD |
| CPU | Intel i7-7700HQ | Intel i5 5600K | Intel Core i5 | Intel Celeron Apollo Lake N3450 |
| GPU | GTX 1050ti GPU | NVidia GT720 | Intel Iris Graphics 540 | Intel HD Graphics 500 |
And these are the specifications of the server device:
- WiFi 6 built-in adapter + 2.5GbE Ethernet port
- 32GB RAM
- NVMe SSD storage
- AMD Ryzen 5 5600xt
- Radeon RX 6800xt.
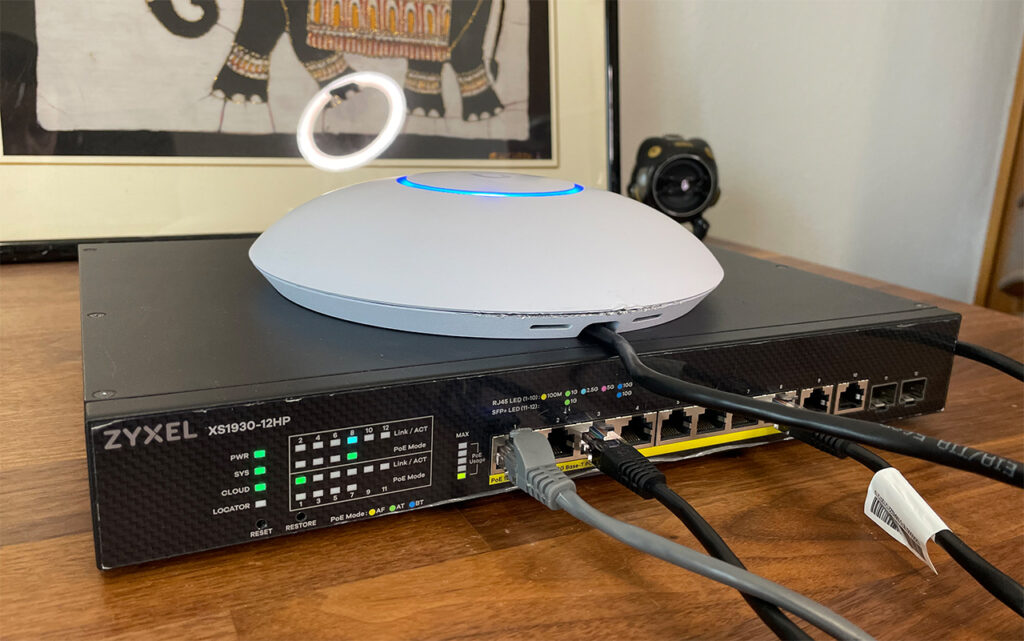
Also, since the Ubiquiti U7 Pro has a single 2.5GbE port, I had to rely on a PoE+ switch, but I used the behemoth Zyxel XS1930S that has multiple 10GbE PoE++ ports available. We also need to see the signal attenuation for each client to get a better idea about what to expect.
| 2x Lenovo Y520 | Custom PC | MacBook Pro | ZimaBoard 832 SBC | |
| Signal Attenuation | -38dB & -39dB | -41dB | -35dB | -68dB |
With that out of the way, we can see that the U7 Pro handled the five simultaneous 1080p streams better than the EnGenius ECW536 did, but is it enough for a good user experience? Well, the WiFi 6E client did stay at about 50ms for 75% of the time, while the rest preferred to gradually get closer to 100ms.
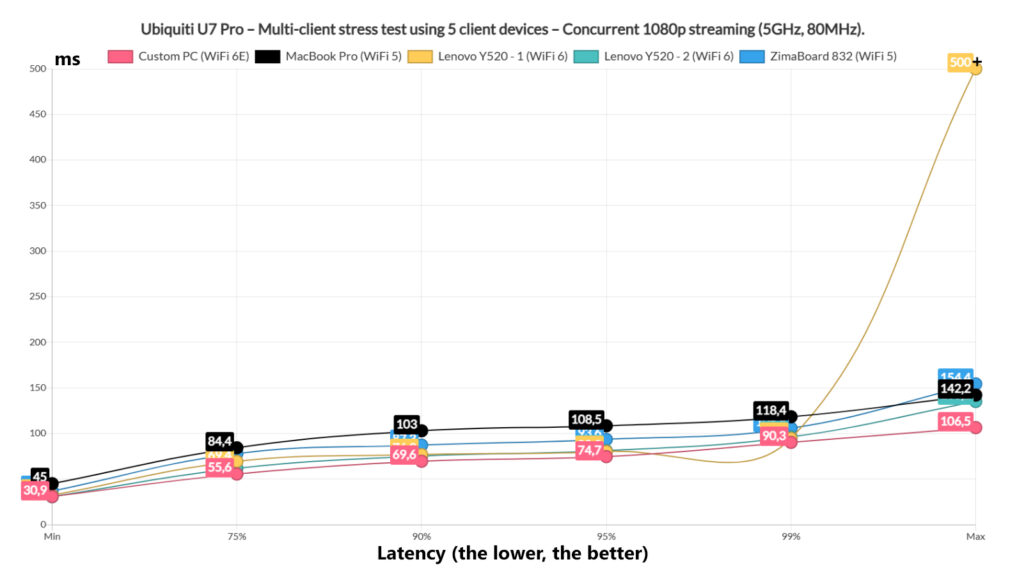
The MacBook Pro went above it for 10% of the time which is far from ideal. Overall, it’s not great, but it’s still usable and the user will experience some occasional buffering. Moving on to the simultaneous 4K streaming, we can see that it put more strain on the U7 Pro.
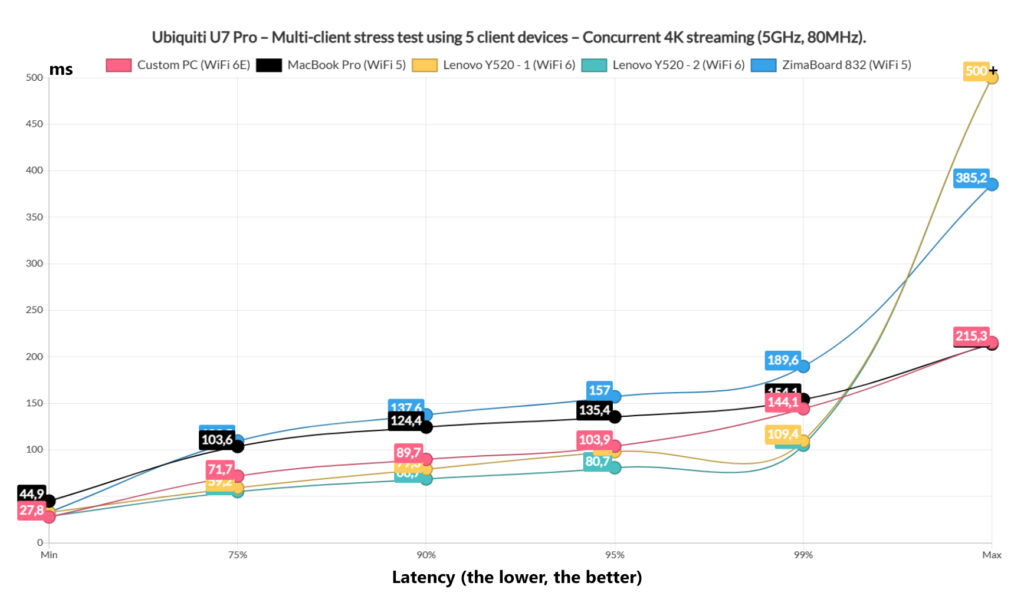
We can see that a couple of client devices, the WiFi 6E PC and one WiFi 6 laptop stayed near 50ms for 75% of the time and managed to remain underneath 100ms for 95% of the time, while the other clients, especially the two WiFi 5 devices quickly raised above 100ms and stayed there for the entire duration of the test. Again, when compared to the ECW536, it’s a better overall latency.
It’s now time to add the intense browsing alongside the streaming traffic and it is worth mentioning that I made sure that simulated the way a web page behaves by loading multiple 128KB of data at the same time, while also injecting 500ms of jitter. So, while the five clients devices were streaming the simulated 1080p traffic and furiously navigated the web, these are the results.
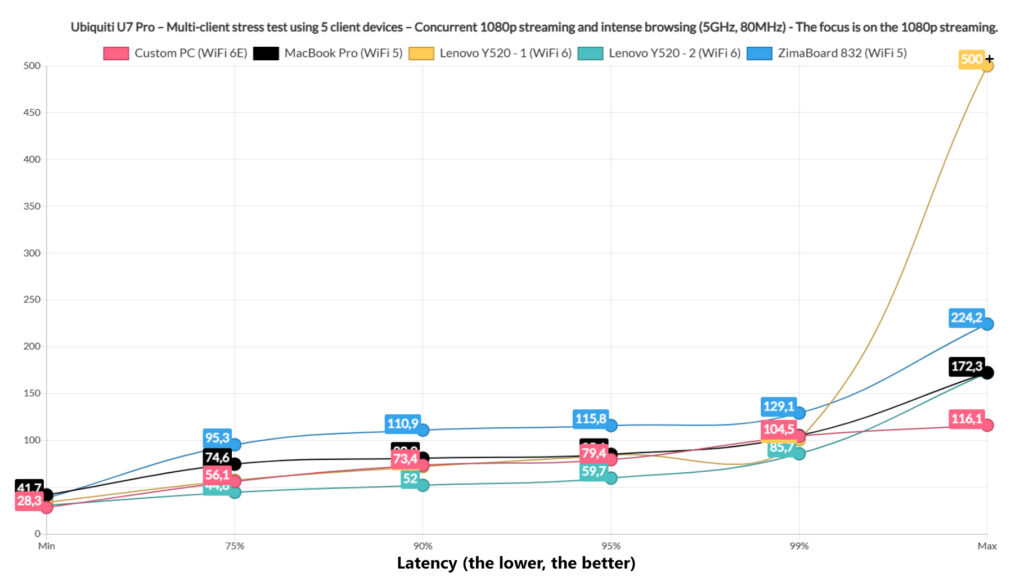
We first checked the 1080p streaming graph and it’s better than expected. We can see that one WiFi 6 client device stayed below and near 50ms for 95% of the time which is good and the WiFi 6E client remained near 50ms for 75% of the time. Only one client raised above 100ms pretty much consistently and it’s the ZimaBoard 832 which is the most far away device out of the bunch.
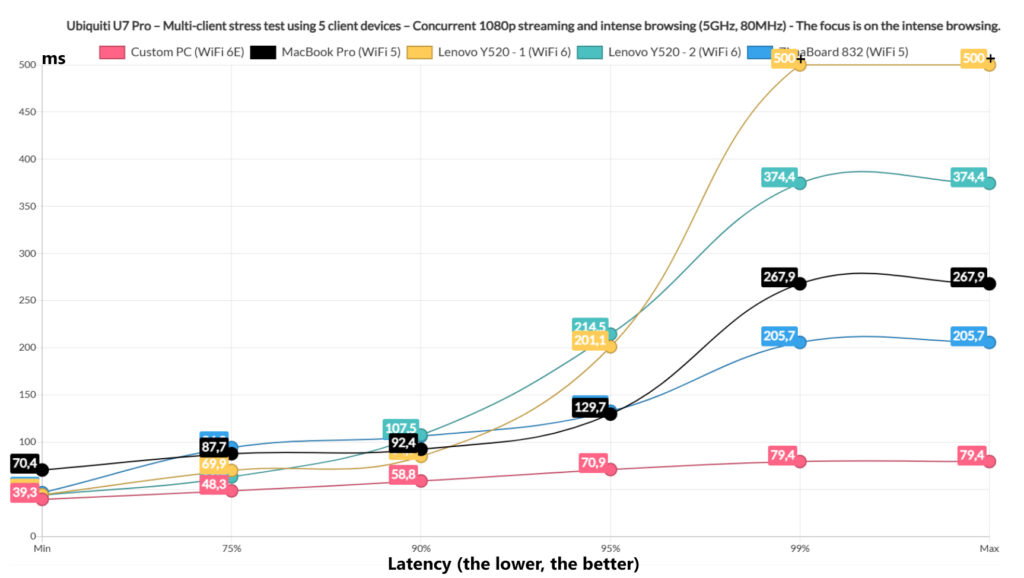
Moving to the intense browsing part of the test, we want a low latency once again, but it can go higher than 1s, one second and a half if necessary after which the user will get frustrated and will reload the page. And all clients behaved nicely, with only one client going higher than the rest for 1% of the time. Now let’s move to the 4K streaming and the concurrent intense browsing tests.
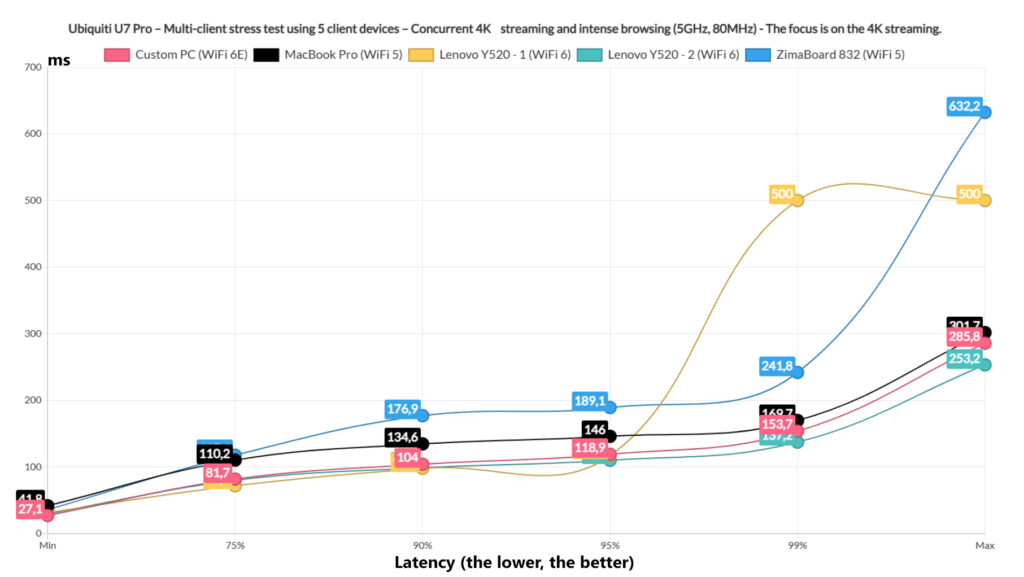
Things do get difficult for the U7 Pro, but with the exception of the two WiFi 5 clients, all other stayed below 100ms for 75% of the time. Other than that, we do see values above 100ms across the board and the ZimaBoard even raises near and eventually above 200ms. This means that the user will experience frequent buffering.
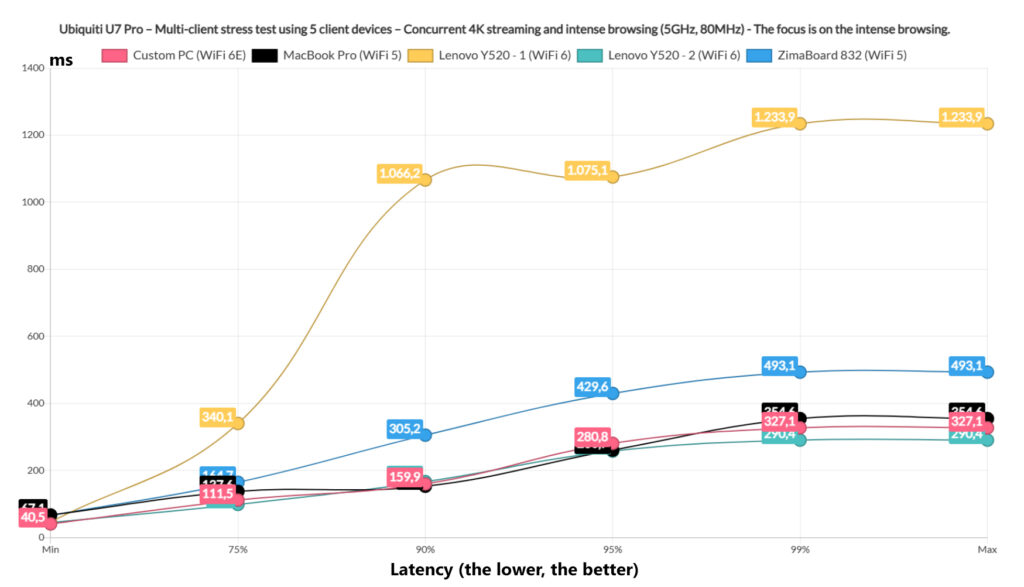
But is the intense browsing experience good at least? For four clients yes, but one WiFi 6 laptop did go above 1s which is borderline performance. Still a better latency than the ECW536. At least for now because as we will see, adding the downloading traffic into the mix pushed the U7 Pro to its limits.
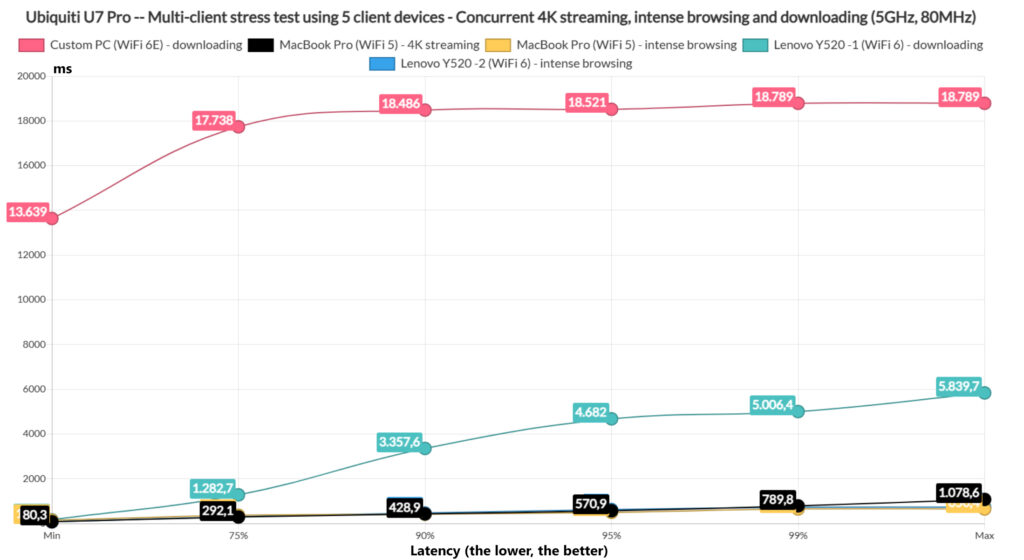
I started with two clients downloading 10MB files continuously without any limit to the bandwidth they can use and I didn’t make any adjustments to the QoS, it’s all set to the default values. Two clients ran intense browsing traffic and the last one was simulating 4K streaming at a rate of 35Mbps. One downloading client had ridiculous latency values, almost 19 seconds, while the second one was still very high with values above 2s and reaching 5 seconds.
Far from good. The 4K streaming was handled better by the EnGenius ECW536, while on the U7 Pro, it’s close to unusable. The intense browsing remained underneath 800ms for the entire duration of the test which is passable performance. The total throughput that the downloading clients offered was 524Mbps.
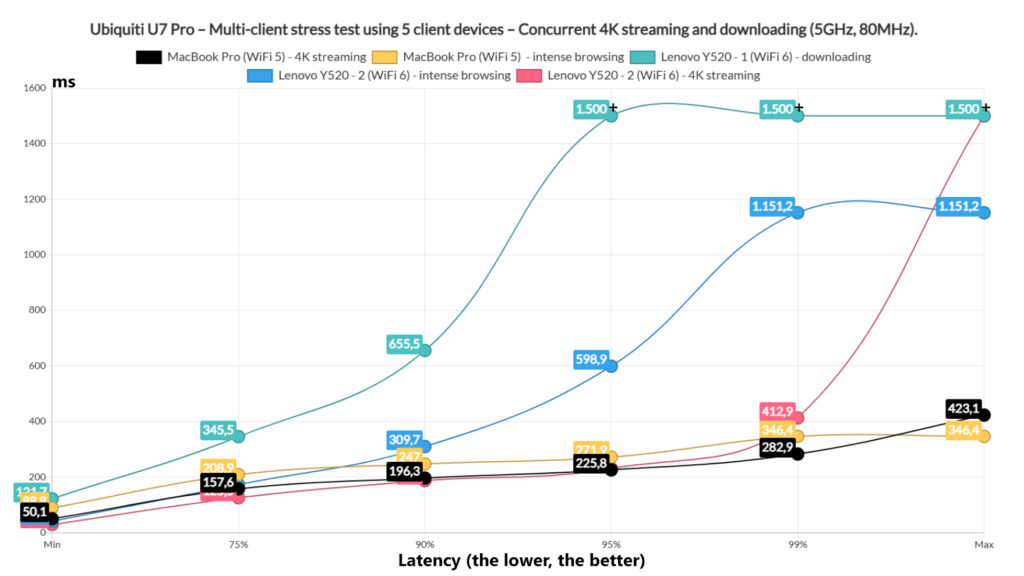
Moving forward, I allowed only one client device to run the downloading traffic, while two clients browsed the web intensively and two were streaming 4K at 35Mbps max limit. The downloading client rose above 1 second and went far beyond it for 5% of the time and it did stay at about 345ms for 75% of the time. It’s throughput was 673.8Mbps. The 4K streaming was again handled poorly, while the intense browsing clients managed to remain within the limits.
I continued to lower the stress and only used three clients, one for downloading 10MB files continuously, one for the 4K streaming and one for the intense browsing traffic simulations.
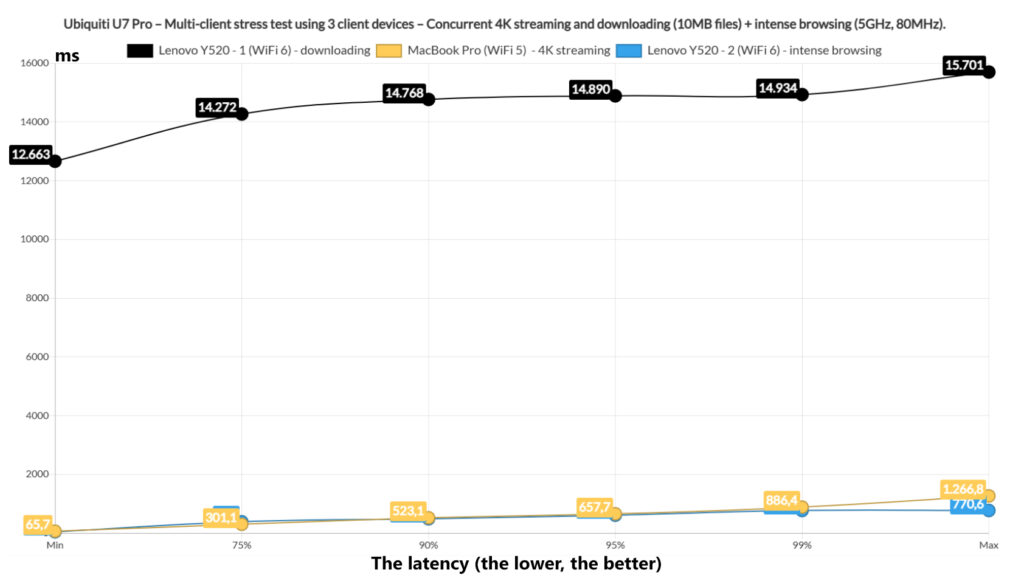
Only the intense browsing provided acceptable latency values and it’s interesting to see how the ECW536 performed so much better. Afterwards, I switched one of the three clients from 4K streaming to VoIP, but again, the uncapped downloading traffic slowed down everything, even if it was moving 1MB files this time.
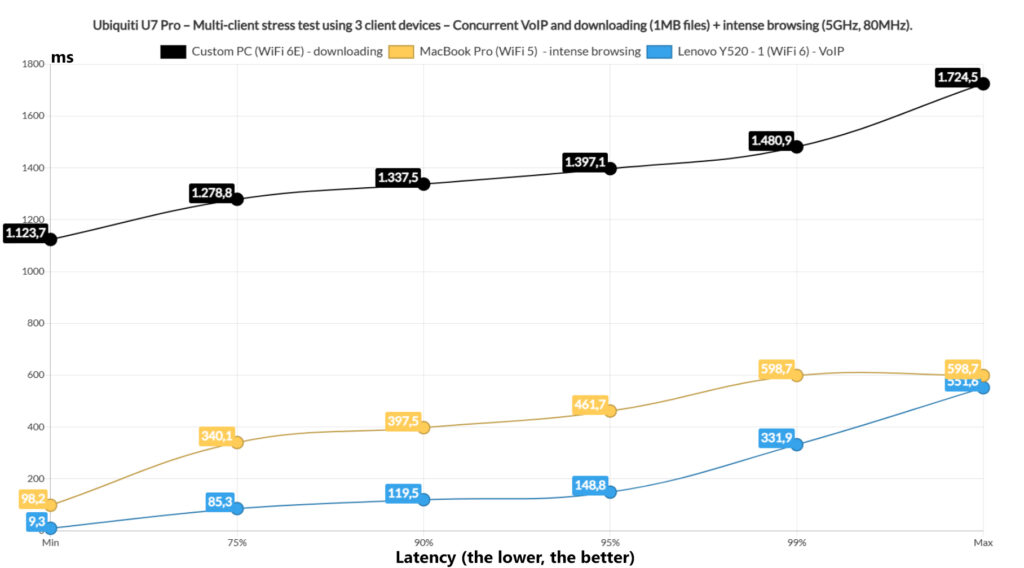
And it didn’t really have much to show for it, since the throughput was, on average, 567.2Mbps. Far from reaching the bandwidth limit. The conclusion is that you want to keep the downloading traffic in check with QoS otherwise it can slow down the entire network. The last multi-client test is to simply let all clients download the 10MB file continuously and the results are as expected.
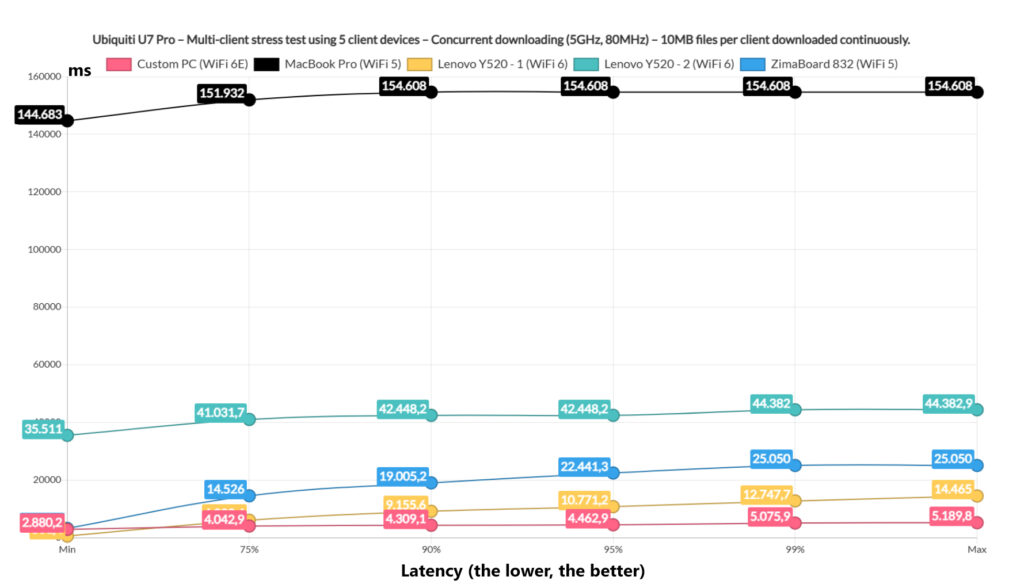
The MacBook Pro showed latency values up to 2 minutes and a half. Yes, minutes.
The UniFi Platform
I know that the networking gear, especially the wireless access points have moved towards a heavy reliance on a Cloud platform, but the good news is that Ubiquiti let’s you run an instance of the UniFi locally so I wasted no time and accessed it from my PC. You can run UniFi on most NASes, on a Raspberry PI and there are even some routers that will let you run it as an additional app in the background.
That being said, we do get to see some status data under Dashboard and there is also the iconic Topology section where you get to see an a map of your network. But we are interested in the UniFI Devices section where we can access the dedicated options of the U7-Pro. Before that, understand that you can set up some general WiFi settings that can be applied to any newly added access point.
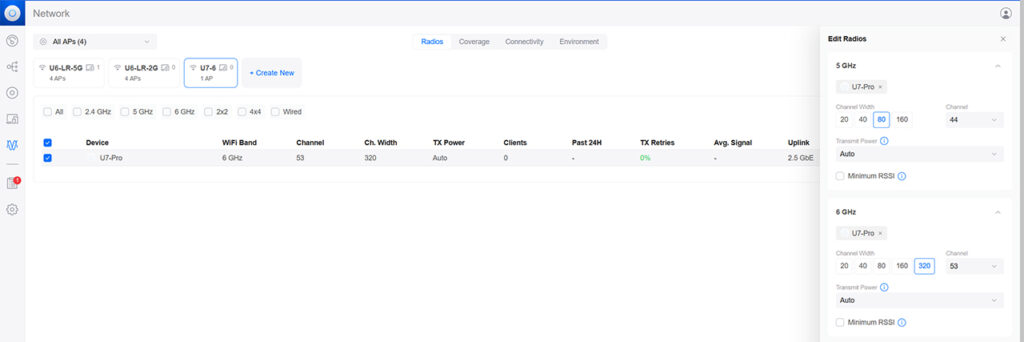
And these can be adjusted under Radios. As you can see, I have configured three networks, one for each radio band and they get applied to the new access point, as long as there is compatibility. But returning to the dedicated options, we can change the inherited ones under Settings. Here, we can also check some Insights about the device and the networks, as well as get an Overview of what’s going with the U7-Pro.
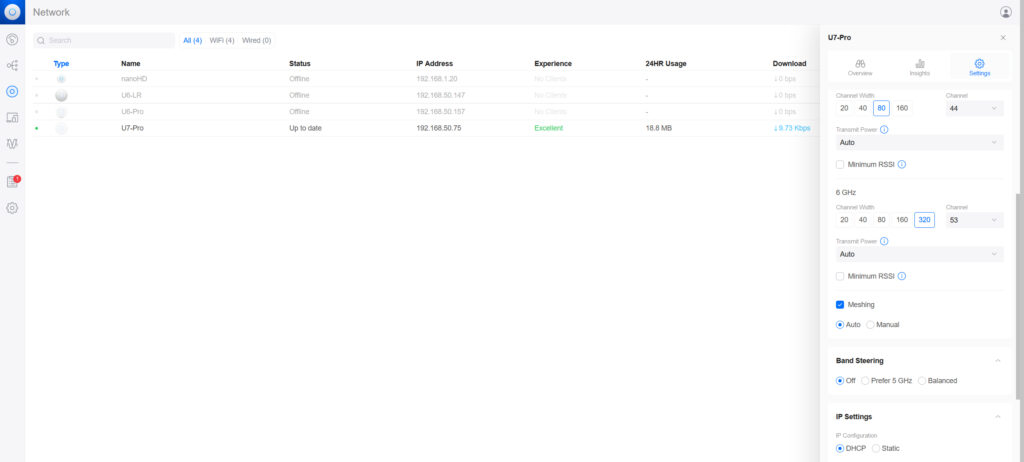
Each client you connect to the access point can be visited under Client Devices and each gets the same Overview, Insights and Settings trio available, but the control is fairly limited here. There are some more Advanced options available if you go to Settings > WiFi and choose whichever network you want. Here, you can create a Hotspot Portal which is useful for hotels and other similar businesses. Band Steering is also available, so is Client Isolation, BSS Transition and Fast Roaming.
This last feature is necessary for a seamless transition between multiple access points. I should also mention that there is an app available as well called UniFi and it offers pretty much the same options as the web-based interface that we have already explored.
The Conclusion
Should you get the Ubiquiti U7 Pro or should you go with either another brand or use the older U6 Pro or U6 Enterprise? The answer is pretty simple, if you can’t use the 6GHz radio, then wait a bit more since the devices at the end of this year and during the next year will be better in terms of feature implementation. As you know, MLO is still not present on the U7 Pro. But even as a WiFi 6 access point, it is only 2×2 MIMO, while the U6 Pro is 4×4. And yes, it can have an impact on the performance. Then again, I saw some good numbers while testing the U7 Pro, so the decision is up to you.

[…] https://luumina.com/ubiquiti-u7-pro-t… […]
[…] technologies may require different chipsets in the future. Why I say that we’re looking at the U7 Pro main competitor is not only because they’re very close in terms of price, but also because […]