The TP-Link TL-ER7206 is the better model from the SafeStream Gigabit Multi-WAN series and it was designed to act as the security gateway to an Omada system. So, it’s very similar to the Zyxel USG Flex 100 and probably closer in functionality to the Ubiquiti ER-X, especially since it has a multitude of WAN ports available.
Indeed, the TP-Link TL-ER7206 supports up to 4 WAN connections, three Ethernet ports and even an SFP WAN port (module) that you can use in case you have fiber wiring available. Furthermore, the device will also work as a reliable VPN router, offering up to 100 LAN to LAN IPsec connections, 50 OpenVPN, 50 L2TP and 50 PPTP VPN connections. And there’s also the support for the Omada SDN which I have seen in action a few times with some wireless access points and Ethernet switches.
But, besides seeing how well it integrates with other Omada devices, there is one particular reason why I chose to check out the TP-Link TL-ER7206. I have been waiting for a replacement for the Cisco RV340 which has reached EOL and the security support will end in October this year, but Cisco seems to have moved away completely from this affordable series (for now, at least).
That is, unless you want to go the enterprise route and use the Cisco ISR 1000. For those that don’t, the TP-Link TL-ER7206 may just be what they were waiting for. And let’s not forget that TP-Link has been throwing punches towards Ubiquiti as well, offering a very similar software experience to the UniFi. So, without further ado, let’s check out the TP-Link TL-ER7206 multi-WAN VPN router.
Design and Build Quality
The TP-Link TL-ER7206 follows the design of most firewall gateways out there (with the exception of the wavy DrayTek Vigor2926), so expect a rectangular case entirely made of metal, including the front side. The case is covered by a black matte finish and it measures 8.9 x 5.2 x 1.4 inches (22.6 x 13.1 x 3.5 cm), so it’s fairly compact, but the downside is that you can’t really mount the router in a rack, unless you decide to use a tray.
It’s not really the ideal solution, but TP-Link surely made available the possibility to mount the TL-ER7206 on the wall, right? No, you only get four silicone feet to keep the firewall router on your desk, which is unfortunate.
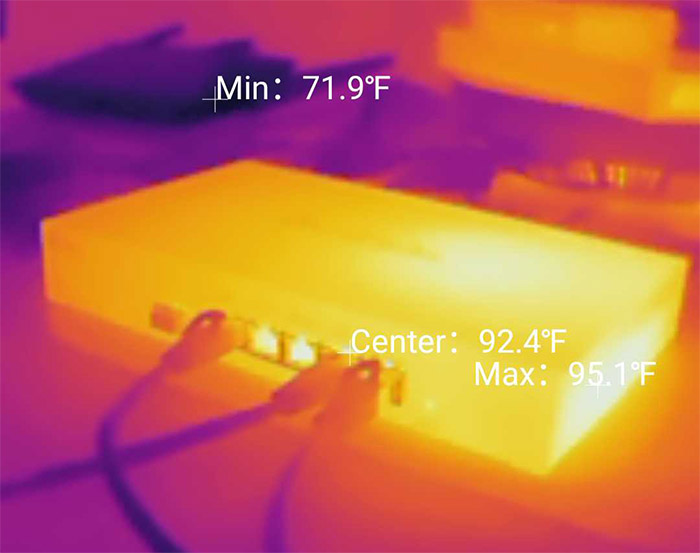
As for ventilation, the TP-Link TL-ER7206 is surprisingly conservative, having only a few holes on the sides and nothing more. So, does it heat up? I have used the AGM Glory Pro to see the temperature of the router while I was running some tests and, as you can see it gets warm, but doesn’t display any signs of overheating.
And it doesn’t really surprise me considering that there is no PoE output built into the TP-Link TL-ER7206 (you will need to use a separate Ethernet switch to connect your PoE access points). This takes us to the ports section.
From the right, there’s the recessed Reset button (to return the device to its factory settings), followed by five Ethernet ports. The first is separate and it’s a Gigabit WAN port, then, there are two WAN/LAN ports which, as the name suggests can function in either manner; lastly, there are two other LAN-only Gigabit ports. Moving further to the left, you’ll see the Gigabit SFP slot which is covered by a protective plastic piece (would have preferred silicone) and next to it, there is a SFP WAN LED.
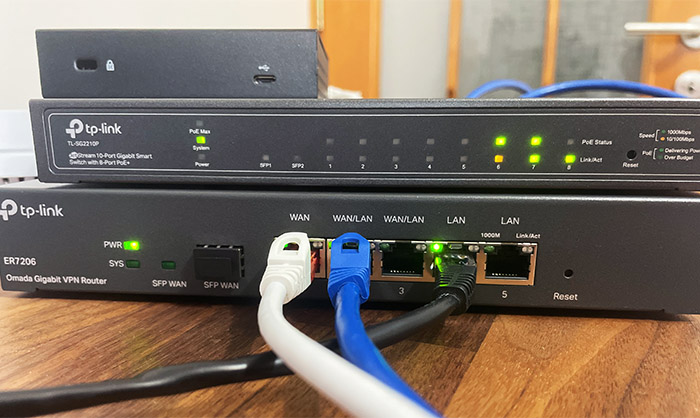
If it’s flashing, then there is activity, otherwise, the LED will stay solid green and the same is true foe each LED that’s positioned at the top of the Ethernet ports. The last two LEDs will show the status of the Power and the System (if it’s flashing, then it works fine, otherwise, it means that it has encountered an issue that needs to be investigated).
If there would be a minus, it’s that there is no USB port to allow for one more WAN interface using a 3G/4G dongle. Turning the TP-Link TL-ER7206 on the other side, you’ll see the Kensington lock slot, followed by the grounding screw and the three-pin power connector – don’t worry, the PSU is internal.
Internal Hardware (TP-Link TL-ER7206 Teardown)
There are no particular impediments to opening the case since all you have to do is to remove the three screws from the rear side and slide the top cover out. So, no warranty seals or any other annoying attempt at self repair discouragement.
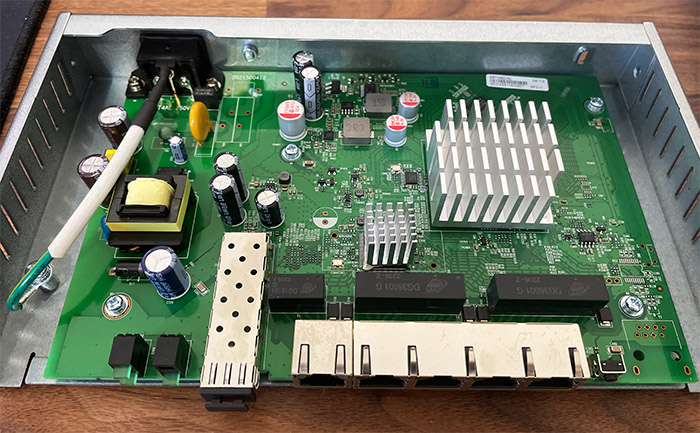
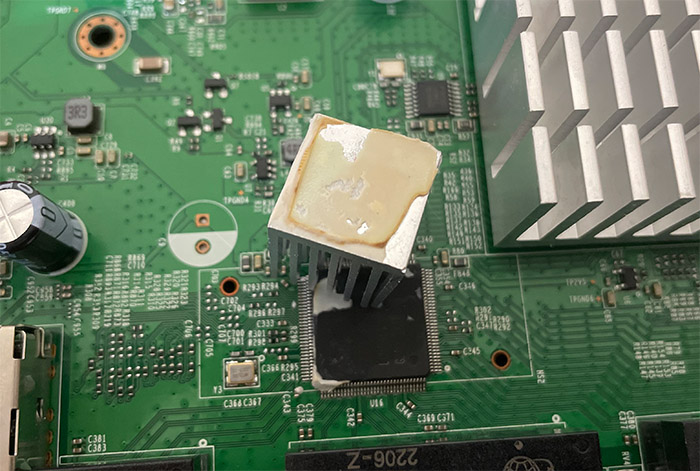
But, after having a look at the board I noticed that TP-Link used that annoying glue paste thing for the heatsink of one chip and it soldered the heatsink of another. This makes me think that it wasn’t really a cost-effective solution, it’s to keep prying eyes out. And it works because most would have no idea how to remove these safely. Unfortunately, neither did I because not only was the main chip soldered, it was also glued with that dreaded paste.
The good news is that I did remove the smaller heatsink, revealing a RTL8367S LQFP-128, high-performance 10/100/1000M Ethernet switch. I could also identify the 512MB of RAM (2X Samsung SEC 204 K4B2G16) and 128MB of flash storage from ESMT (F59L1G81MB). I also decided to check out the FCC ID website with the hope that I may yet see the CPU, but this device doesn’t seem to be on that website.
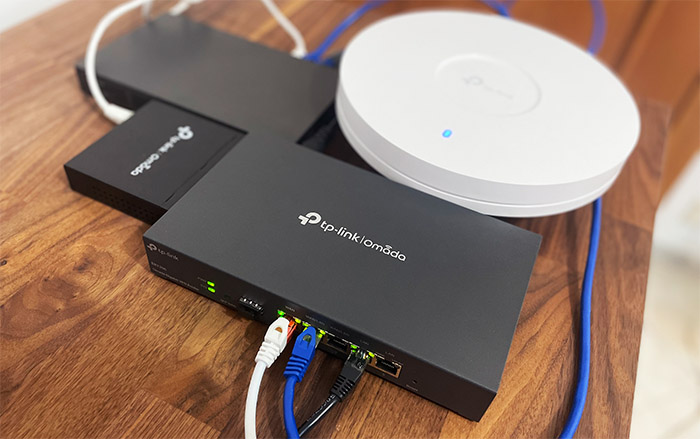
What I could gather is that it’s a 64-bit dual-core CPU with the clock at 880MHz, which is not that impressive. As expected, the TP-Link TL-ER7206 does not have any WiFi capabilities, so you will need to use additional wireless access points. For example, I did recently tested the EAP660 HD which worked great with Omada – you may also need a PoE switch, such as the TP-Link TL-SG2210P.
| TP-Link TL-ER7206 | Draytek Vigor2926 | Zyxel USG Flex 100 | |
| CPU | dual-core 880MHz CPU (probably Mediatek) | dual-core 720MHz CPU (?) | dual-core 1.2GHz Cavium Octeon III CN7020 |
| RAM | 512MB Samsung SEC 204 K4B2G16 | 128MB WINBOND W971GG6SB | 2GB Nanya 1922 NT5CC512M8EN |
| Storage | 128MB ESMT F59L1G81MB | 128MB Toshiba TC58NVG0S3ETA00 | 8GB Kingston EMMCC08G-M325 |
| Switch | Realtek RTL8367S | Qualcomm Atheros AR8035 | Qualcomm QCA8337 |
Note: I need to mention that the model that I got is v1.0 and there is a v1.6 which may suggest that it has different components. But, this is not the case because it seems to only indicate that the TP-Link TL-ER7206 was built in a different facility, everything else is the same.
The Standalone Mode
Even if the TP-Link TL-ER7206 is advertised as an Omada gateway, it’s going to work just fine in standalone mode as well. And the quickest way to access the interface is by connecting the router to your PC and entering 192.168.0.1 in the URL bar. Immediately, you’ll be asked to create a new admin account (don’t use admin as the username) and that’s about it, you’ll be able to access the GUI.
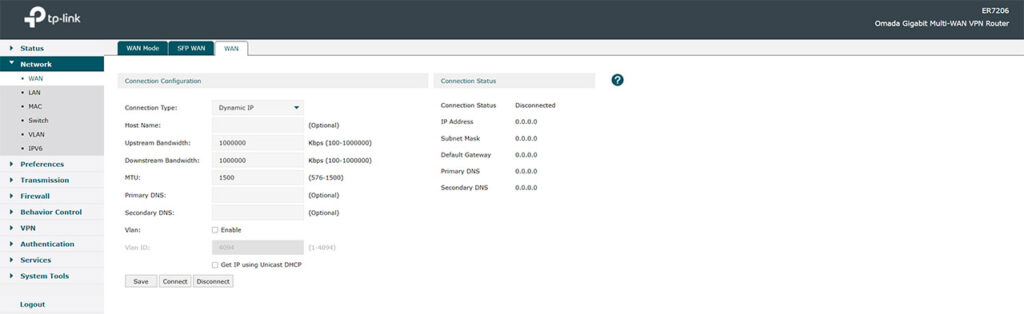
Since there was no Internet access, I connected an Ethernet cable from my modem to the main WAN port and then I went to Network > WAN > WAN, chose PPPoE as the Connection Type and entered the ISP credentials. I clicked on Save and Connect to gain access to the Internet. The GUI doesn’t feel crowded and you don’t get dozens of options thrown at your face.
And that’s not because the TP-Link TL-ER7206 is lacking any important feature, it just has a good layout. As a quick overview, you can enable additional WAN ports under Network, as well as configure the Ports behavior (Port Mirroring, Rate Control and Flow Control). I noticed that TP-Link put the VPN IP Pool list under Preferences, but the most interesting features can be found under Transmission.
Here, you can configure the NAT-related features (One-to-One NAT, Virtual Servers, NAT-DMZ, ALG and Port Triggering), the Bandwidth Control, the Routing settings (Static Route and Policy Routing) and the Load Balancing which includes Link Backup and Online Detection. The Firewall offers Anti ARP Spoofing, Attack Defense and Access Control, there’s also Behavior Control with Web Filtering and Security, and then, we get access to VPN.
The TP-Link TL-ER620 supports IPsec, L2TP and PPTP. Under Services, you can set Dynamic DNS and UPnP, while the System Tools is useful for upgrading the firmware, enabling the SNMP, checking the Diagnostics and more.
Note: After a restart, it takes almost 3 minutes to get access to the Internet back up to the client devices, but when using the SDN, I noticed that it takes a minute less.
Dual-WAN Configuration and Test
In standalone mode, I saw that it was possible to enable Load Balancing, but I was unable to set a ratio between the two Internet connection.
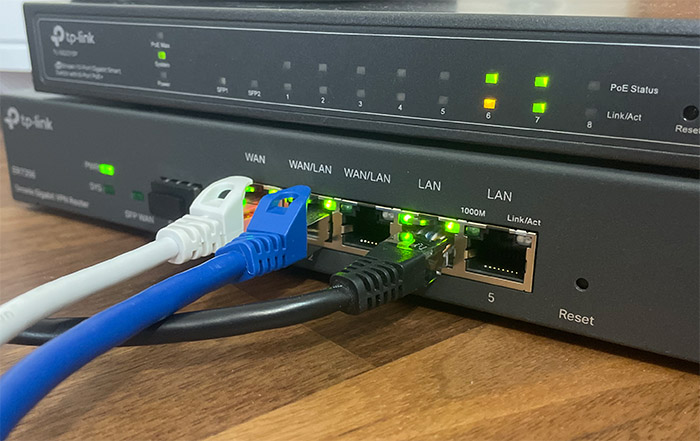
TP-Link does mention that I could Enable the Bandwidth Based Balance Routing on ports, but it seems that it’s done automatically (1:1) since I saw no other settings in this mode. Which is why I decided to switch to the Omada SDN and check if there are more options there. I was already using the OC200 alongside the TL-SG2210P Ethernet switch and the EAP660 HD WiFi 6 access point, so all I had to do was check the Gateway section to see that the TL-ER7206 was waiting to be adopted.
After the Provisioning and (automatic) Configuring process was done, I checked to see if the settings from the standalone site were indeed ported to the SDN and they were. So, I went to the Settings > Wired Network and Internet where I immediately saw that the Load Balancing was indeed more clearly laid out. You can see that I chose WAN and WAN/LAN1 as the two WAN ports and, as for the Load Balancing Weight, it’s set by default as 1:1. Which makes sense since most people prefer to have both links equally involved.
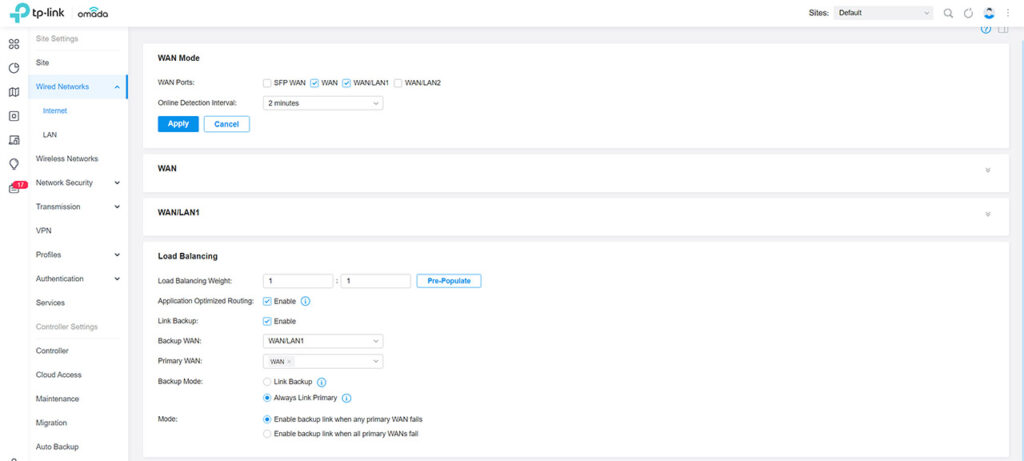
But you can also select the weight to be 1:2, 1:3 and so on, if one link has less bandwidth available than the other. Also, it’s very important to have the Primary and the Backup WAN already set, especially for the Link Backup option. The idea is that in case the Primary WAN fails, the TP-Link TL-ER7206 will start the secondary connection immediately. You will see this option next to the Mode, where you can Enable the backup link when any primary WAN fails or when all primary WANs fail (can be more than one).
As expected, I had to check just how quick the switch from one WAN to the second was, so, being inspired by SmallNetBuilder.com, I ran two concurrent Ping tests to 8.8.8.8 and 1.1.1.1, and I disconnected the cable from the primary WAN port.
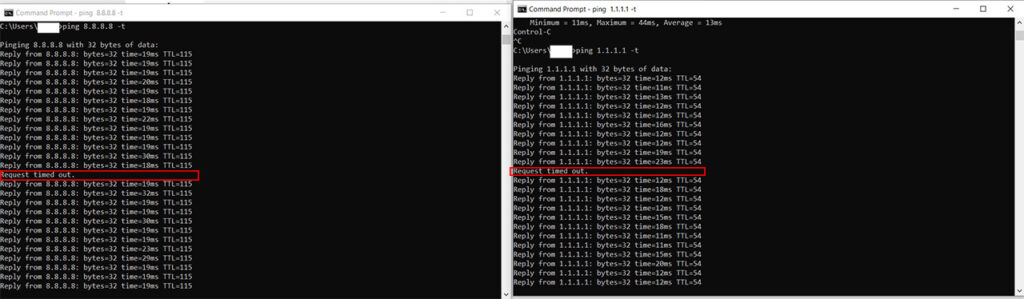
As you can see from the screenshot, there is a “Request time out” – a single packet drop – then the connection went back to normal. I redid the test several times to make sure that I see the same behavior every time, so yes, you’re going to lose one packet when the Internet connection switches from one WAN port to the other.
The VPN Configuration and Tests
To set up a VPN Policy (using the Omada SDN), you need to go to Settings > VPN and click on Create New VPN Policy. Then, give the new VPN connection a name, Purpose (Site-to-Site or Client-to-Site) and the VPN Type. The TP-Link TL-ER7206 supports L2TP, PPTP, IPsec and OpenVPN, and for the first two, you can choose the Encryption (don’t leave these connections unprotected), as well as the Service Port and Protocol if you decide to use the OpenVPN.
Next, you can choose the Local Networks to which the VPN policy will apply to, the Pre-Shared Key and the WAN port. What’s interesting is that you can choose the IP Pool directly from this section and it will automatically be allocated, which is simpler than on other devices.
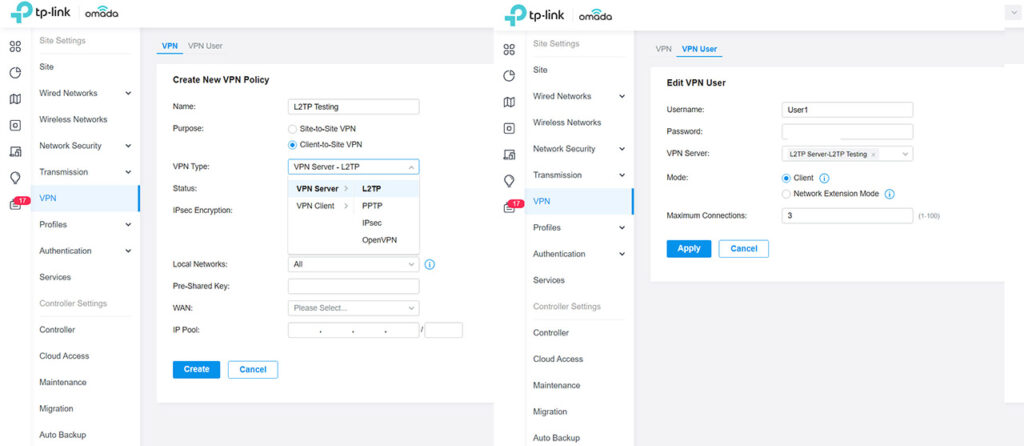
The VPN User is very simple to set up since all you need to do is to enter a Username and Password, choose the VPN Server (from those that you have already created) and the Mode. It can be Client or Network Extension Mode (if you want to connect clients only from the configured subnet). You can also choose the Maximum number of Connection, but other than that, that’s about it, so I decided to check out if I could successfully connect using an iPhone.
After setting up an L2TP and PPtP VPN Policy and Client, you need to go to Settings > General > VPN & Device Management from the iPhone and then to tap on Add VPN Configuration. From the Type, it possible to choose either IPSec or L2TP, depending on the tunnel you wish to connect to, then you can choose any Description you want (I used Lotto due to an auto-correct from L2TP!) and the Server.
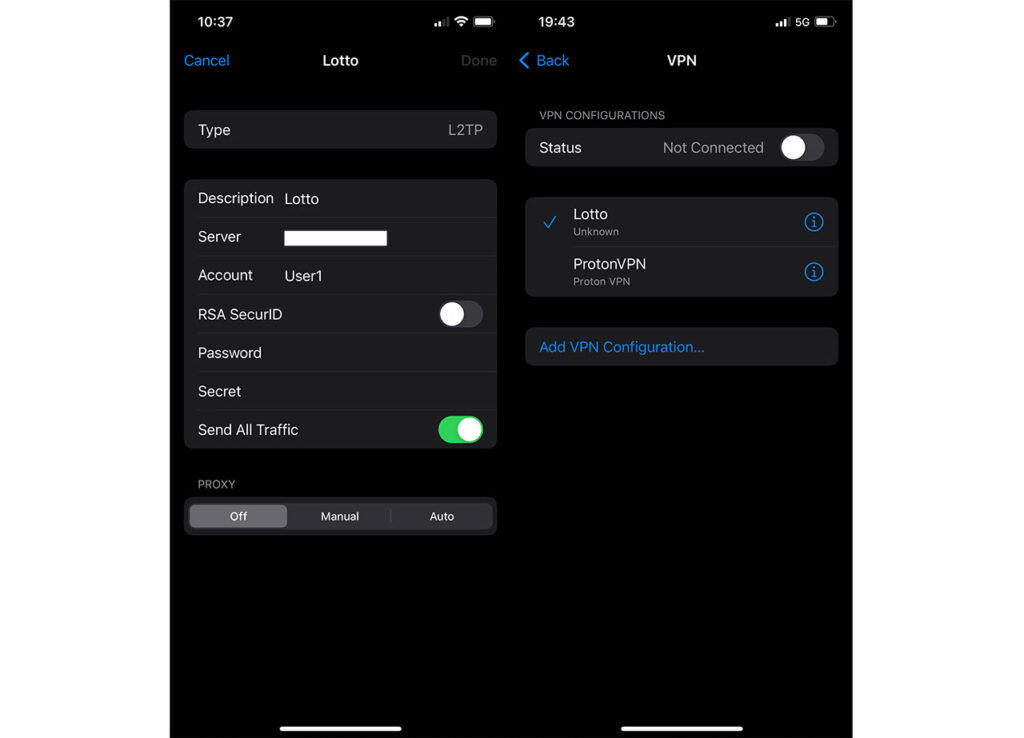
You can identify the Server IP address from the Omada SND: go to the TL-ER7206 and click on it to open the dedicated settings on the right side; afterwards, under Details, click on the active WAN connection and copy the IP Address. Under Server, enter the VPN Client credentials (that you previously set), including the Secret (the same as password) and click on Done. You should now be able to connect to the router via a VPN connection.
I also decided to check out the throughput between two devices connected to the router, one acting as the server (with a direct connection to the TP-Link TL-ER7206 via cable) and the other as the client device (the same iPhone 12). I have tested this client device before at it showed an average of 750Mbps up and 590Mbps downstream. This was done using the TP-Link EAP660 HD AP and the TL-SG2210P switch to power it on.
| Client to Server | Server to Client | |
| L2TP | 17Mbps | 14Mbps |
| PPTP | 19Mbps | 12Mbps |
After using the L2TP connection, I measured an average of 17Mbps upstream and 14Mbps downstream. Next, I checked out the PPTP speed performance (using an Intel 8265-equipped laptop since the iPhone no longer supports PPTP) and it was just as limited since I saw an average of 19Mbps upstream and 12Mbps downstream. This is a client device that I tested before with the EAP660 HD, so, at the distance that I tested it (5 feet), I usually see approx 531Mbps up and 285Mbps downstream.
INFO: Since I run this test with pretty much all routers that I write about, I decided to check the LAN-to-LAN performance of the TP-Link TL-ER7206 as well. And it was 945Mbps upstream and 887Mbps downstream, which is in line with most other networking gateways out there.
Security-related Features (Omada)
The security features on the Omada SDN can be found under Settings > Network Security and there’s the Access Control List which has a section dedicated to the Gateway. It allows the creation of rules for blocking or allowing traffic based on a multitude of Protocols, including TCP, UDP, TCMP, GGP, AH, AX.25, EtherIP, L2TP and more.
Then, there’s the URL Filtering for Gateways which will allow you to block specific domains and under the Attack Defense, there are two sets of options, the Flood Defense suite and the Packet Anomaly Defense suite, both fairly comprehensive for a security gateway.
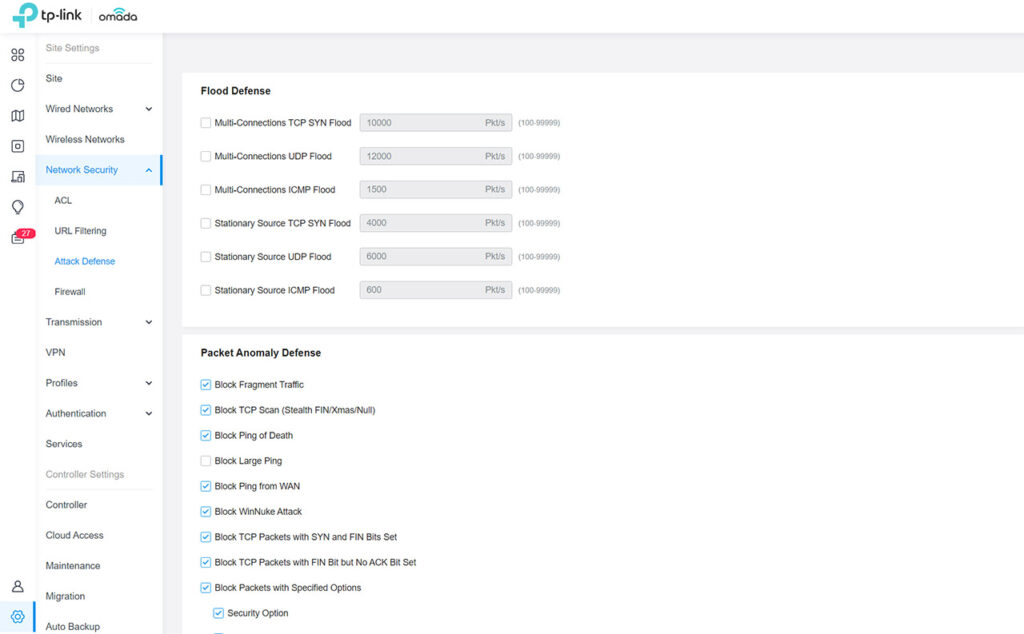
Lastly, I saw the Firewall that offers the option to enable Broadcast Ping, to Receive or Send Redirects, as well as the SYN Cookies. There is also the possibility to set State Timeouts for the ICMP, the TCP Close, Close Wait, FIN Wait, UDP Stream and more.
Conclusion
The TP-Link TL-ER7206 is one of the least expensive multi-WAN gateway available on the market and it will work great alongside other Omada networking devices. But can it truly be considered an alternative to the inexpensive Ubiquiti gateways or even the now-EOL Cisco RV345? It depends on the size of your network and if you’re willing to switch to TP-Link hardware. Software-wise, both the stand-alone mode and the Omada SDN are very easy to navigate, configure and monitor, and I do have to admit that the manufacturer was clearly inspired by the UniFi controller, which I suppose many will see as a plus.
At the same time, it’s not yet as matured as other SDNs and perhaps some very advanced settings are missing, but even in its current form, I think it will be more than enough for most SMBs. Especially due to all those WAN ports (including the WAN SFP slot) which offer so much room configuration, so, as a conclusion, I do think that the TP-Link TL-ER7206 is a fun and easy-to-use gateway.